Image by Startup Stock Photos
Software teams usually need a hosted distributed revision control system to collaborate remotely. If your project has less than 5 users and you need to work with private repositories, have a look at Bitbucket. Bitbucket is an attractive option for managing your code in unlimited private repositories for free.
This post includes a typical workflow for software teams, basically creating a repository on Bitbucket, adding and committing changes, adding and deleting branches, creating pull requests and merging them into master. I hope this helps you to start building your projects on Bitbucket.
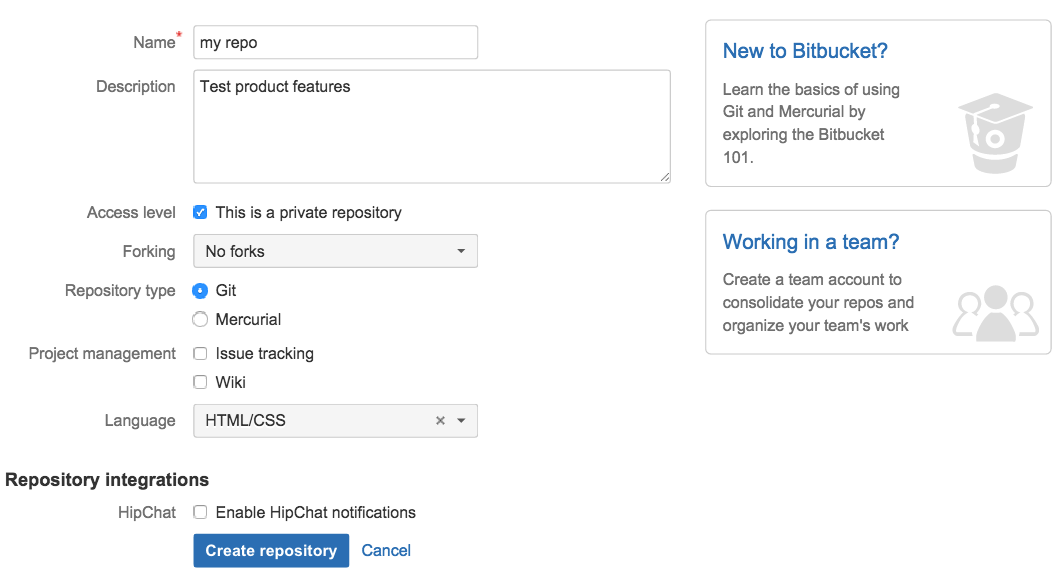
1. Create a new repo on Bitbucket
2. Create your local repository with git init
Let’s open your Terminal and type:
$ git init demo3. Set remote repository
Set the new remote repository you created on step 1. With this git command we’ll bookmark that the origin refers to this URL:
$ git remote add origin https://kavajaga@bitbucket.org/kavajaga/demo.git4. Check status
Check the status to see if there are untracked files that need to be added and committed:
$ git status5. Add changes to staging ares
This command will add all modified and new files to the staging area:
$ git add .If you check the status at this point with git status, you’ll see that there are changes we can now commit.
6. Commit changes
Use the git commit command to create a snapshot and commit the changes to the top of your history:
$ git commit -m "Add .js and readme.md"7. Push changes
Push the changes from your local repository upstream to the remote repo you specified on step 3:
$ git push -u origin master8. Create a new branch
As a team, you usually need to work with new features. Let’s create and checkout to a new branch locally, in this case my new branch will be feature-style:
$ git checkout -b feature-style9. Check branch
Let’s check if you’re in the branch you’ve just created in the previous step using git branch command:
$ git branch
  * feature-style
  master
10. Edit, add and commit your changes
Make changes on the new branch. Once you have finished with your changes, add them to the staging area with the git add . command, check status and finally, commit these changes:
$ git add .$ git status
On branch feature-style
Changes to be committed:
(use “git reset HEAD <file>…” to unstage)
new file: images/.DS_Store
new file: images/opt.svg
new file: images/testLogo.svg
modified: .DS_Store$ git commit -m “Add image file”11. Push changes
Push the changes of your local branch upstream to the remote repository:
$ git push -u origin feature-styleIf you check your bitbucket repo, you’ll see the branches created and commits.

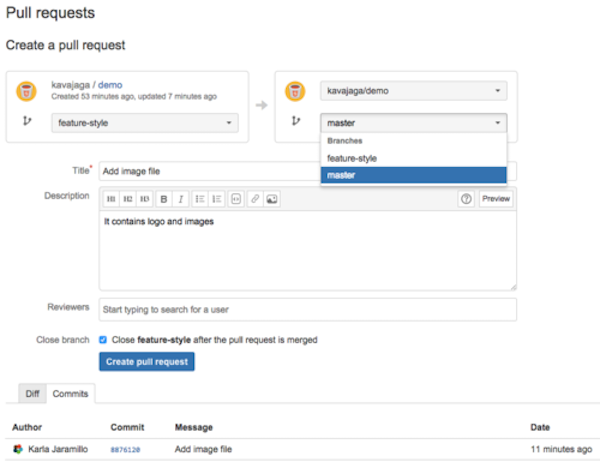
12. Create a pull resquest
Now, it’s time to create a pull request to merge your new feature. Go to Bitbucket and pick the branch you want to create a pull request, in this case select from feature-style to master:
13. Merge branches
If you’re the reviewer, you’ll see an open pull request on your Bitbucket project. Let’s merge it into the master branch by clicking on the merge button.
14. Pull changes
To keep your local master updated, checkout your local master and pull the latest changes from the remote repo:
$ git pull origin master15. Delete local branch
Once your branch has been merged by your reviewer (on step 13), let’s tidy up your repo by deleting the branch you created and pushing that change to Bitbucket.
Delete local branch:
$ git branch -D feature-styleDelete remote branch:
$ git push origin :feature-style– or –
$ git push origin –delete feature-style